Bullet-proof Bak Kwa Recipe

Lunar New Year is around the corner again and I’m going to let you into a little secret… I’ve not bought Bak Kwa, a kind of meat jerky that is served as a snack during the festive season.  And since everyone’s bugging me for the recipe, I don’t mind sharing it, in case some of you are sick of queuing and paying for this overpriced produce (USD $45 to $50 per kg is a rip-off IMO)

Ingredients

500g of minced meat (pork or chicken will work, make sure there’s some fats to them)


The marinate

1 tbs peanut oil

1 tbs fish sauce

1 tbs Chinese cooking wine or Sherry (I use Shao Xing wine)

3 tbs Soya sauce

1 tbs oyster sauce

1 tbs good quality thick black sauce

100g white sugar

3 tbs honey

2 tsp five-spice powder


Optional:

1 tbs fermented red bean curd

½ tsp rose water

1 tsp of red colouring


Method


Start by combining all the marinate ingredients, I use a whisk to make sure the powder and fermented red bean curd is mixed evenly.  Don’t be lazy on this step!


Pour everything into a Ziploc bag, including the meat, zip it up and mix it around until a dark crimson red mixture is achieved.  For best results, leave it over night in the fridge.


Pre-heat oven to 120 degrees-c


Line a sheet pan with parchment (baking) paper and pour HALF the mixture into it.  Use your hands or a spatula to spread the meat evenly to form approximately 28cm x 22cm.


Bake in oven for 20 minutes.  The meat should dry and some liquid will seep out from the meat.


After 20 minutes, turn the oven up to 160 degrees-c and continue baking for 10 minutes.  Use a brush to pick up the liquid that seeps out and baste the meat with it.  This is the liquid that will give you a glaze as it reduces on the meat, or turns into black carbon if left on parchment paper.


Flip the meat over, cut it into 4 pieces and continue baking for another 10-15 minutes until you get a nice shiny glaze on the surface.


Let the meat cool down and it can be stored for up to 2 weeks in the fridge.  Heat it up in a toaster or microwave oven before serving.


Optional

Traditionally, the bak kwa is heated up or finished in a charcoal grill.  However, we can achieve that similar charcoal smoke flavour using the following Indiancooking method..  Using a big work or pot, spread out the meat in vessel, leave some space in the center for a bowl.  Heat up 2 pieces of charcoal over the burner until it’s red hot and place it in the bowl.  With the lid of the vessel in one hand, pour in a little oil over the hot charcoal, and quickly put the lid on.  Leave it in there to smoke for 15-20 minutes.

Post to Twitter

Laksa recipe


Laksa - gravy enriched by rich coconut milk

 Due to popular demand, I have decided to spend some time to type out the recipe of one of my favourite local food in Singapore, the Nonya Laksa. Believe me, many Singapore wedding photographers love this and we have regular meeting ups at some of our favourite laksa spots, like the famous one in Jln Berseh (Near Kelatan Lane).

I know a lot of photographers who are highly obsessed with something else in life apart from photography – audiophile, coffee/wine, watches, etc. Cooking is one of those things that I do a lot because it’s almost reached a stage whereby if I can make these at home, why should I pay someone else to cook it for me?

Now here’s one Laksa recipe that I learnt from my folks. And trust me, when you want to make the best Laksa out there, don’t start thinking about the calories and cholesterol…Laksa is comfort food, and comfort food that’s healthy well, it’s almost non-existent.

This recipe has gone through a bit of tweaking and every bit of effort is made to maximise the effect of the spices and ingredients that we use.  The approach is somewhat Western for this oriental recipe, but trust me, it tastes almost as good as those you get one the streets.  I will also highlight the steps meant for the hard cores who wants the best 🙂

Here we go…

Ingredients

for the Sambal Chili paste, the heart of the Laksa flavour.  Please don’t bother with those ready to go sambal chili in packs or jars. Besides being inferior in taste, they have tonnes of MSG inside, and you might find yourself persistently thirsty after that)

12-15 dried chilies (about 3 inches in length)

Blue ginger (aka wild ginger) 1.5 to 2 inches (the alternative is to use old ginger, but it won’t have that woody fragrance of blue ginger)

2 cloves of garlic

15 shallots, peeled (or 2 large Spanish red onions)

4 Lemon grass, cut away the leaves but don’t discard them.

6 pieces of Candlenut or Macadamia nuts

About 50g of dried Shrimp paste (aka belachan), use a little less if they are very salty.

1 tablespoon Tumeric powder

1 teaspoon of cummin

one handful or Laksa leaves, or 1 table spoon if using dried ones. You may use fresh basil or mint if you can’t find laksa leaves.

100ml of peanut oil

Optional:

3 medium size chilies, seeds removed. Heat factor 4 out of 10. Seeds on – Heat factor 5 to 6.

For those who wants more heat, you might want to add 3 small chilies (aka chili padi), which should bring you to heat factor of 7 to 8 out of 10.

juice from half a lime


for the Laksa gravy/soup, you’ll need

Freshly squeezed coconut milk from 2 coconuts (hardcore) or 700ml of pasturised coconut milk that’s available in the chillers (not too bad a compromise) or 500ml of coconut cream from the supermarket shelves (last resort)

100g of good quality dried shrimps, slightly bashed with rolling pin, and soaked in hot water for about 10 minutes

1 litre of chicken stock

Sea salt to taste

3 tablespoons of palm sugar or brown sugar


for the condiments

Fried bean curd (tau pok), cut into bite size

500g to 1kg of thick rice noodles (or yellow noodles)

fishball

fishcakes

crab sticks (Optional)

shredded chicken breast (I shred these from the chicken I use to prepare the stock)

hard-boiled eggs

bean sprouts

dried laksa leaves (basil or mint leaves work as well)

fresh cockles (or clams)


Method

Throw the dried shrimp paste into a pan, on a medium heat, roast the paste until it turns golden brown on the outside.  Soak the dried chili in hot water to soften it a little and combine all the ingredient in the chili paste in the blender and let it blitz for a few rounds till you get a smooth paste.  Hardcore method: Bash everything in mortar and pestle, my grandmother said flavour extraction is different when you press , mash and bash.  For me, the oil should be a good enough carrier of flavour in the blender and mind you, bashing that blue ginger is not easy…. Think of this as making a spicy pesto sauce – you have the chili, the herb, and nuts.

Heat up some more peanut oil in the casserole pot or wok.  Blend or finely chop the shallots, and sauteed it in the pan over medium low heat.   Once the shallot has soften and about to brown, add in the chili paste and be prepared for the chili to smart your nose!  Remember the piece of dried shrimp paste that we toasted?  We can now break it up into small bits and throw it into the mixture. As for the 4 lemon grass stalk that we cut off and set aside, smash it with the back of the knife till it is bruised and add it to the pan. It is very important that the ingredients are sauteed to the point when the oil starts to separate from the chili paste; this requires some patience over a medium low heat, stirring constantly and depending on the heat and vessel that you’re cooking in, it can take almost 10 minutes for that to happen.  This is the most *important* step of the entire recipe, so give it some time & love….don’t burn it!

Once the oil in the chili paste starts to separate, pour in the dried shrimp and the liquid that hydrated it,  half the coconut milk, chicken stock and palm sugar, bring everything a simmer, no high heat or the coconut milk is going to separate and that’s a big no no.  At this point, add in the tau pok (fried bean curd) and let it soak up that gravy. If you are using clams instead of cockles, this is the time to add them into the simmering gravy and cook them till the shells are opened.  Any clams that are unopened should be discarded.  Finally, add the rest of the coconut milk and season with salt to taste.  Remove from heat right right after it boils.

In a big pot, bring about 3 litre of water to boil, add about 1 tablespoon of salt and blanch your rice noodle in it. Since rice noodles are already pre-cooked, the purpose of blanching it is to remove the starchiness and heat up the noodles.  Hardcore step: after blanching the noodles for 30 seconds, transfer them into another vessel and rinse them till the water becomes clear.  Another reason why we do this is to get rid of that husky taste in rice noodles and improve the texture.  For those who have cooked Japanese buckwheat noodle or soba would be quite familiar with this step as well.

Now the fun part, strain and portion out the noodles and tau pok in a bowl, and cut the noodles using a pair of scissors.  This way, you can eat them with just a soup spoon (and no chopsticks) and minimise the splattering (you won’t want to get any of the laksa gravy on your clothes).  Put the meat condiments like cooked fish ball, fish cake and raw cockles into give your noodles a spa treatment of laksa gravy by pouring over them.  This should also cook the cockles a little and personally, I like them to be half-cooked.  Sprinkle some of the laksa leaves or basil or mint on top and Bon Appetite!

tip: make the laksa gravy a day in advance, reheat by bringing it back to boil, taste even better this way!  If you plan to do so, don’t add the salt yet until the next day and adjust accordingly… somehow, the gravy tends to be more saltish overnight.  The coconut milk in the gravy can be quite a pain and tends to go rancid (when you get foams or a sourish taste/smell) pretty easily, especially if you are using fresh coconut milk.  For the leftover gravy, just bring them to a boil, do not cover the pot, do not stir it… when it’s cooled down, you may put the lid back before putting it in the fridge.

Post to Twitter

Canon Creative Asia Wedding Photographer of the Year!

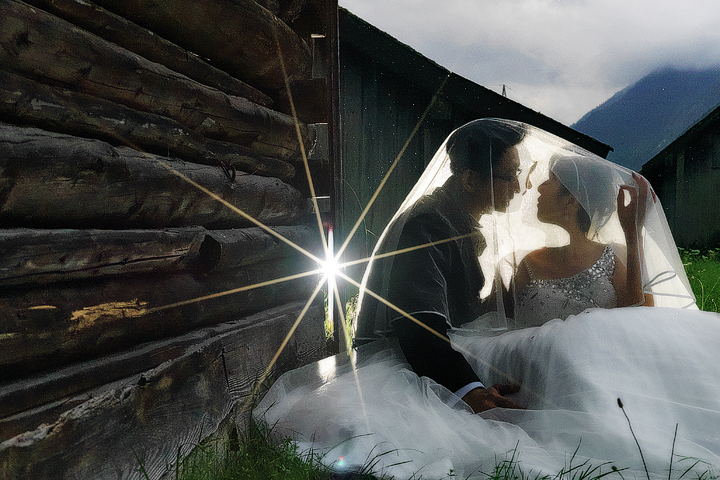
Further to my previous post about the Canon Creative Asia Photography competition that saw 1500+ entries worldwide.  The final judging was done ‘live’ in front of an audience and stream online, and I’m very pleased that this entry came in 1st for the Engagement category and clinched the title Canon Creative Asia Wedding Photographer of the Year!

1st place in Engagement category and Overall winner – “Two” Balloons

Apart from that, 2 other images came in 2nd and 3rd placing in two other categories, both came rather close with a difference of 2 and 4 points from the top image in the category.

2nd place under Bride & Groom together category

3rd place – Bride or Groom Alone

Nonetheless, it’s really good to hear what different judges have to got to say about the images that were submitted – expert opinions are certainly more valuable!

Chinese New Year sure come early this year! 🙂

Post to Twitter

More reasons why Hasselblad H4D-40

The previous post about the Hasselblad H4D-40 has officially become the most read thread on this blog ever!  There has been so much interests in it from both clients as well as photographers about this new tool that we are using.

One other thing that the Hasselblad can do very well over the 35mm DSLR is the optics that are made for it – sharpness and contrast aside, they have excellent flare control and here’s an example of what exactly I’m talking about.

 The Canon EF 16-35mm f/2.8L mk II probably has the best flare control in my canon range of lenses.  Lens hood were mounted on the respective lenses to minimise flare and both filters were spotlessly clean when we shot these.  Note that both the camera angle and light position were kept constant (mounted on tripod).  Camera setting are identical, ISO 400, 1/20s shutter speed, f/8 for this test.

Hasslelblad H4D-40 with 35-90mm aspherical


Canon 1Ds mark III with 16-35mm mk II


I’m sure the results speaks for itself.  The Canon suffers from contrast loss as a result of the flare, whereas the Hasselblad truly shine in this area.  That’s another 1 more point for the Hasselblad!

Post to Twitter

Tools of the Trade – inside the Wedding Photographer’s bag (part 1)

“So what camera / lens do you use?”  This is probably one question that haunts me throughout my career as a professional wedding photographer, and they either come from friends, other photographers, or even my clients (occasionally).

Yes, equipment discussion is not really my cup of tea, but some of you might find this post interesting to read, maybe.  First, let me qualify myself. 

1.  This is purely for info sake.  I’m not sponsored by any photographic related companies nor paid by anyone for writing this. 

2. One should use equipment according to his /her photography style – there’s no such thing as a one-size-fits-all-uber-setup. 

3. These equipment that I’m reviewing are based on what I’ve used and what has worked for me.  To put it simply, this setup compliments my style of photography. 

4. Good photography is not about how well-equipped you are, it’s about how well you use your equipment. 

5. When in doubt, please refer to point #1 🙂 

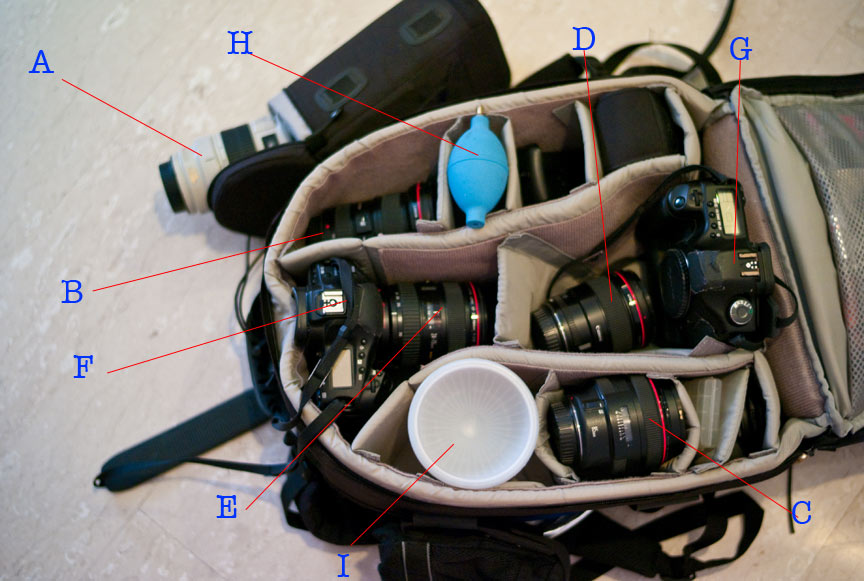
Ok, here’s a snap shot of my bag just before I packed the contents into my dry box. 

Equipment

What's in my bag

A. Canon EF 70-200mm f2.8L Image StabliserB. Canon EF 16-35mm f2.8L Mk 2

C. Canon EF 85mm f1.2L Mk2

D. Canon EF 35mm f1.4L

E. Canon EF 24-70mm f2.8L

F. Canon EOS 1Ds mk 3

G. Canon EOS 5D

H. My trusty 8-year old Swiss-made blower

I. Gary Fong’s flash diffuser.  Some call it Fongdom, most of my clients call it the tupperware 😀

A. Canon EF 70-200mm f2.8L

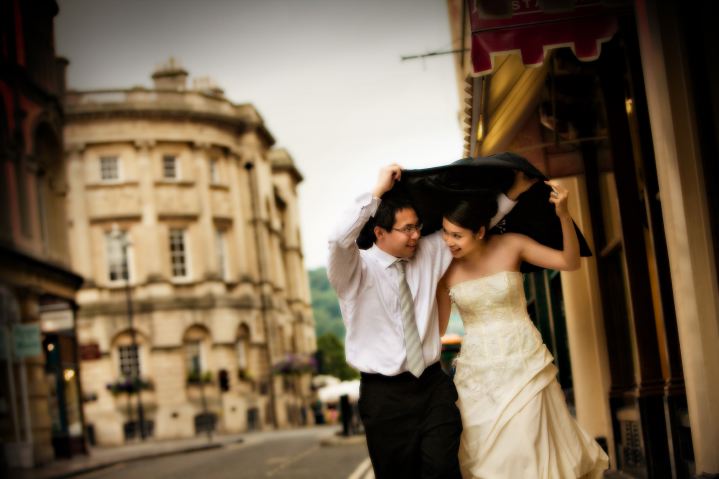
One of my first Canon ‘L’ series lenses that I bought back in 2002.  Use this mainly for outdoor portraits and / or in situation where I want to compress the scene.  I don’t use this alot indoors because f2.8 is just not fast enough for me. Personally, I find this lens very useful on a dull day, especially when we want to isolate the subject from the background. For example, the photo I shot in Bath, UK

Canon 70-200mm f2.8L IS 

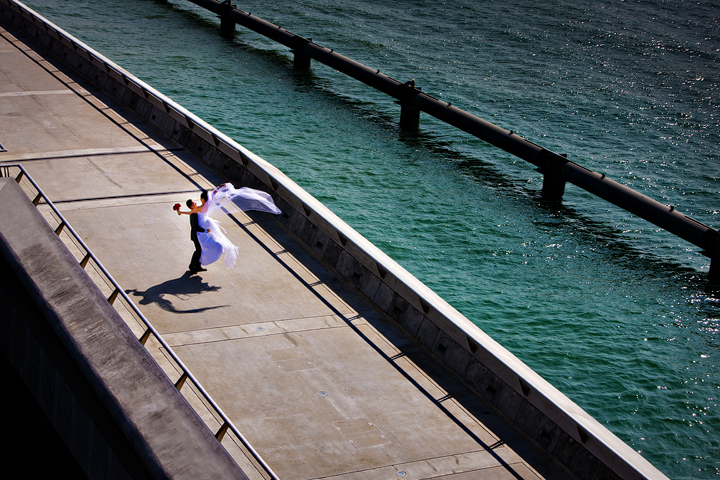
or use to compress the scene, as in this example that I shot in Marina Barage, Singapore.

 Equipment - Lenses

or for a reasonable amount of bokeh or background blur…

Equipment

to be continued…

Post to Twitter

Casual snapshots in Newcastle

Greetings from UK!  I’m actually on a train traveling towards Central London – they actually have wifi onboard their National Express!

This is going to be one of the shortest trips ever, after spending 17 hours getting my butt to Newcastle from Sg yesterday, I’m spending 8 hours in Central London doing some shopping and meeting clients there, hopefully grab some funky toys from Hamleys for the boys.

Had one of the worst oil dripping fish and chips in Newcastle yesterday, but well…that gave me enough energy to take some photos around Newcastle upon Tyne)

🙂

[nggallery id=16]

Post to Twitter

Out of town notice

 As I’ll be heading to Newcastle and London tomorrow, all meetings and appointments will have to be scheduled after 20 Oct 2009. Looking forward to the cool weather there, get a short break, grab some fish & chips (& beer), meet client, attend an awards ceremony dinner. Oh yes, and wish me luck! 🙂 – Stephen

Post to Twitter

Join our Fan page on Facebook

After much procrastination, I’ve finally launched my own fan page on Facebook…and if you haven’t join us, please do right now, drop by and chill out 🙂

I’ve got some really interesting stuffs and annoucements lined up for everyone on that page, so stay tuned!

294 fans and counting already! 🙂

Post to Twitter

To London?

MPA and WPPI, these are the two organisers of the toughest photography competitions for wedding and portrait photographers, and looking at the previous winners from the different category, photographers like myself will probably spend days hammering out the prints, send them to USA or UK, and hope for the best.

Just received a congratulatory email from Master Photographer Association in London (MPA) that one of my images has made it to the finals for the Overseas Wedding Photographer of the Year Award!

That came together with an invitation to the awards ceremony in London come Oct 2009.

However, much as I would love to attend the awards ceremony, as well as see the other finalists and winner’s print next to mine, plus the chance to mingle with some of the veterans in this biz, I happened to have an assignment overseas.  The biggest irony is, both the clients happened to be based in London, but their wedding will be held in their hometown back in Asia.

Good news and bad news come in a pair, usually.

Post to Twitter

To jack tob, jackson tobias, jack fruit or whoever you wanna call yourself

I receive approximately 20-30 spams daily on my blog and there we have, this chap who caught my attention, and he obviously bothered to copy the same spam and post it 3 times in a month, after I deleted each of them.

Oh yes, the emails that this chap used are jacktob30@yahoo.com and jacktob191@yahoo.com , both of which are non-existent.  So that makes me wonder what his/her real name is. 

But one thing remains the same, the IP address 203.126.56.6 that brings us to National Cancer Centre Singapore;  managed to pull some strings in one of the forums and viola, some fella who calls himself /herself a healthcare professional happens to share the same IP address. Healthcare professional and National Cancer Centre Singapore might be coincidental, of course the IP address, well…. 🙂

So here’s to Jackson Tobias, jack tob or jack fruit or whatever fruit you wanna call yourself, I don’t know what you have against wedding photographers, but just let you know that your words means nothing, since you’re as good as a ghost, nothing.  Call the Clubsnap Live @Sam workshop a joke or a waste of your time for all I care, there are dozens of other appreciative attendees who have emailed or sent me notes to express their thanks.

Yet another classic example of nameless individuals, hiding behind their computer screens and ranting off, which is why the spam queue is the only place such posts will go to.

PS: On hindside, thanks for taking so much interest in my blog and contributing to my hits 🙂

Post to Twitter