Printing for Competitions

It’s the time of the year when competitions start to pile up one after another.  We have the Master Photography Awards,  which I’ve been a part of since 2007, Canon Creativeasia, WPPI and AIPP, spread out over the year.

IMO, photography competition should be a print competition, especially for wedding photography section.  My approach to photography is always about the print and print quality is such a neglected concept amongst wedding photographers, especially when most just want to deliver images on a CD.  Also, what looks good on screen, doesn’t necessary means it can be printed out nicely. Yesterday, I attended a workshop by

To be honest, print quality has never been in my vocabulary until I joined the Master Photographer Association (MPA) from UK.  And trust me, I learnt it the hard, hard way.  First lesson I learnt, you need time to do a good print; knowing how to prepare an image for printing requires discipline.  Before anything gets printed to 8″x10″ or 10″x12″ for the competition, the lab needs to print out a set of proofs on 4″x6″ on the paper of choice.  Choosing the right kind of paper is another hairy part of the print making process that even my own printers have problems grappling with.  Some of the prints are obvious candidates for Kodak Endura Metallic paper or Fuji Pearl paper, some are slightly more artsy that looks great printed on fine-art matt or textured paper, some are safer on lustre paper because of the high dynamic range compared to the former. Oh wait, don’t even bother about metallic or glossy paper for competitions like WPPI, having your prints viewed in a room lit by just 2 strong light source at 45 degrees to the print means you’re probably better off with matt paper…. these are power tips that are shared by veterans as well as judges from WPPI.

For example, this is one print that I did on metallic paper for MPA because of the shimmer in the image itself and the grass textures is brought out really nicely on it.  Matt or lustre paper somehow looked a little too safe for this.

The Missing Link

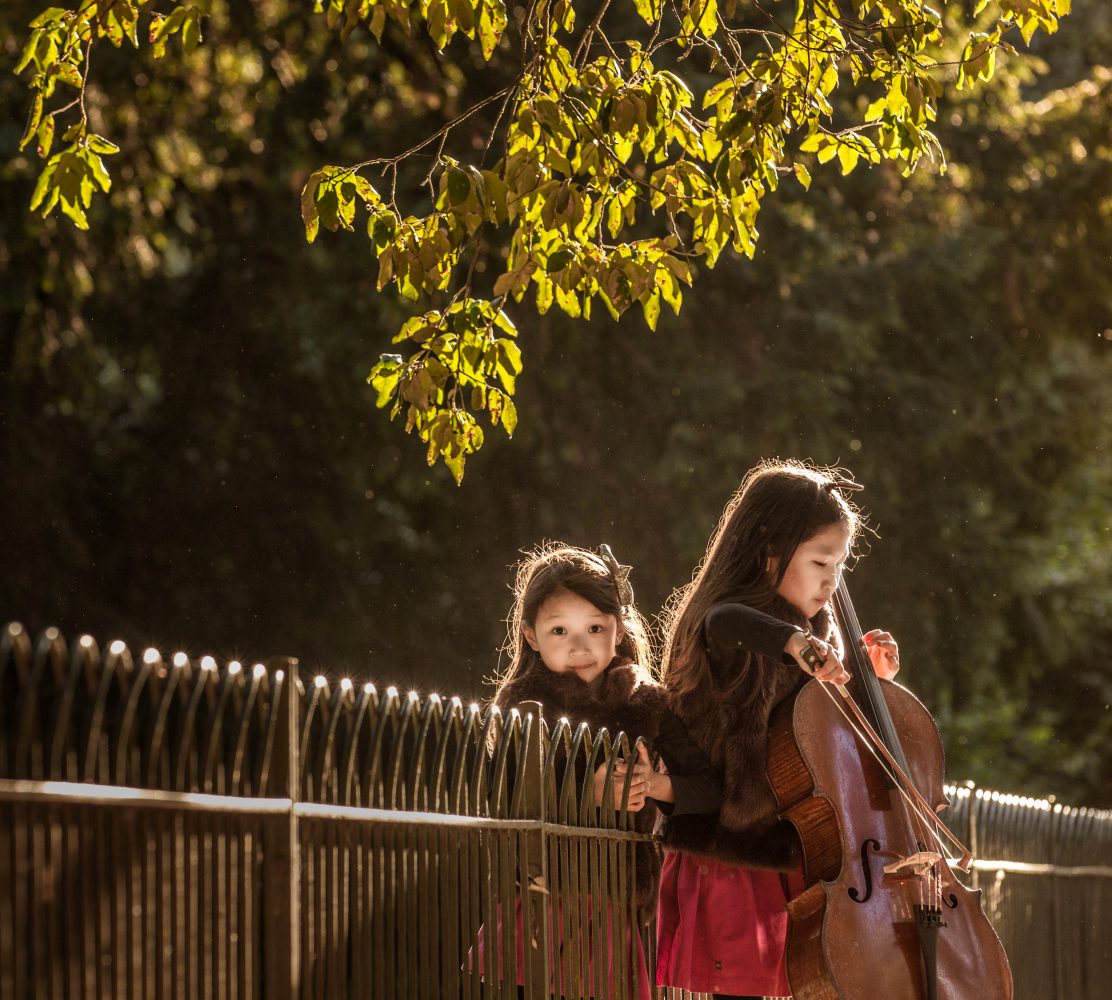
As well as this piece, Tangled

Tangled


The next one that I photographed in Morocco, entitled Hand-some, was printed on lustre paper.


Also, all these works were shot on my Hasselblad H4D-40, a digital medium format setup which gives incredible details and tonality when we print it.  It’s really about how effortless and how smooth the details are being drawn, and this is something that make me wish that all competitions are at least 16″x20″ in print size! 🙂

We have consolidated over 100 prints from 6 photographers to share out the freight cost.  Trust me, a 5.4kg parcel ain’t cheap, but sharing it among 6 photographers makes it really affordable at USD$17 per pax.  Good luck Team Singapore!


Post to Twitter

Wedding Photography tips: Neutral Density Filters – what the Singapore wedding photographer like me can’t live without

One of the biggest challenges for outdoor photography in Singapore is working with rather harsh lighting from the sun.  Some might argue that we have the same sun throughout this solar system, but having done assignments in various part of the world, I’d say that not only is the quality of light very different (the angle in which the light strikes on different part of the world seems different), we have a much longer duration of good light.

A typical outdoor photography session in Singapore usually gives us about 2-3 hours of good quality light, around 4pm to 7pm; in the last shoot we did in Melbourne, we had 7 hours of good light during summer.

To add salt to the wound, clear skies with nice dramatic is a rarity, and even when it happens, chances are that there will be little contrast between the clouds and the sky in what most people describe as a ‘washed-out’ sky.

What photography books will teach you is to use a flash to balance the exposure.  Yes, this method works but Skye Tan, a renowned fashion photographer in Singapore, shared with me his technique of using ND filters for outdoor photography and I can never thank him enough for that.  The idea is to use a neutral density (we’ll call it ND) filter in front of the lens, which not only help to trim down the exposure for the sky and rendering it blue, but also, it improves the contrast between the clouds and the sky.  Using a higher flash shutter sync will make the sky darker, but somehow those shot with the ND filter gives a better sky-cloud contrast.

And I thought lighting in Singapore was harsh enough, until my assignment in Morocco.  Just a week before my trip to Marrakesh in Morocco, a Master Photographer from UK, Kevin Wilson, shared with me how harsh light can get over in the North African city and I went with the ND2 and ND4 filters.  How good are these filters? Well, looking back now, I feel that they made my trip worthwhile!

So what exactly does ND filters do?  Here are some examples:

This is shot by Don Lim, another photographer who was assisting me for this photo shoot.  I got him to take this photo for comparative study later and the image is quite closed to how the scene looked like that morning @9am.  This is done with post-production for the skies to make it look bluer.  The intention of this image is not to show how bad it look (this image looks fine actually), but how much more potential you can get out of using filters for the same scene.


Shot with an ND2 filter with the strobe.  .  Look at the details and texture that we could get from the 4 brick structures, as well as the floor, even under such harsh lighting.  There’s very little post-production work that I did to this image to achieved to get this look.

We proceeded to the palm area and at 10am, we needed to trim off even more light from the sky and out came the ND4 filter from the bag.  Compared to the ND2, the ND4 filter cuts down by 2 stops instead of 1.


More examples from Singapore:

I managed to get the sky details without having to do any post-production to the picture. This was shot on a seemingly cloudy day.

One more example from a recent photo shoot in Singapore under extremely harsh 12 noon sun.  Again, look at how the filter managed to tame the scene down.  Very little or no post-production work was required to bring out the floor or skies details.  The warm tone and sky colour is applied in post-production.


In conclusion, are ND filters a good investment?  Yes, they can be inexpensive if you know where to buy them (Ebay & B&H are my best friends).  No doubt, some might argue even if we don’t use an ND filter, with some more post-production work, we might be able to achieve the same effect.  But that means additional work in Photoshop and in wedding photography, we deal with not one, but a series of images from the same scene for the clients’ album – attempting to do post-production on every image with the consistent amount of dodge/burn can be a nightmare and certainly a tedious task.

If you’re not convinced, you can always try it out with the cheaper ones out there (there are some good buys over Ebay) for a start.  Once you’re comfortable with it, you might want to upgrade to better quality ones like Lee filter or Tiffen.

To end off, many thanks to Skye Tan for his generous sharing of knowledge and techniques on how to bring the Skye sky out in the image 🙂 Also, thanks to Don Lim, for his permission to use the image for educational purpose.

Post to Twitter

Yuh Huey & Trevor – “Courtship”

Here’s a favourite series that I shot recently.  Everyone worked hard for the images – 2 assistants, a pair of sporting couple, 1 photographer and a huge swarm of blood thirsty mozzies.  Yes, the photo entitled “The Missing Link” has received raving reviews on my Facebook page, check it out here

I’ll leave it to you to guess their professions, the “Courtship” photo says it all 🙂

The beautiful gowns are the creation of The Wedding Present bridal boutique.

Post to Twitter

More reasons why Hasselblad H4D-40

The previous post about the Hasselblad H4D-40 has officially become the most read thread on this blog ever!  There has been so much interests in it from both clients as well as photographers about this new tool that we are using.

One other thing that the Hasselblad can do very well over the 35mm DSLR is the optics that are made for it – sharpness and contrast aside, they have excellent flare control and here’s an example of what exactly I’m talking about.

 The Canon EF 16-35mm f/2.8L mk II probably has the best flare control in my canon range of lenses.  Lens hood were mounted on the respective lenses to minimise flare and both filters were spotlessly clean when we shot these.  Note that both the camera angle and light position were kept constant (mounted on tripod).  Camera setting are identical, ISO 400, 1/20s shutter speed, f/8 for this test.

Hasslelblad H4D-40 with 35-90mm aspherical


Canon 1Ds mark III with 16-35mm mk II


I’m sure the results speaks for itself.  The Canon suffers from contrast loss as a result of the flare, whereas the Hasselblad truly shine in this area.  That’s another 1 more point for the Hasselblad!

Post to Twitter

Our latest tool – Hasselblad H4D-40 digital medium format

I have been procrastinating about digital medium format for the past 1.5 years and the easiest excuse to cool the urge of getting one such system is to tell myself that these mammoth machines are just overkill for wedding.  As what many wedding photographers I’ve spoken to have said “Clients can’t tell anyway whether it’s 35mm or medium format”.

And then, came the invitation to attend a seminar that I should and shouldn’t have attended – the Hasselblad product launch held at Shriro Singapore.  The highlight of the event is the latest H4D range of digital medium format cameras and the H4D-40 simply caught my attention because of superb image quality that it can produce.  40 megapixels of goodness.

To me, all these stats means nothing to me until I get to try it for myself.  And the kind folks from Shriro Singapore, who is the distributer for Hasselblad product in Singapore and Malaysia loaned me a set to try out for my upcoming assignment. No obligations to buy if I don’t like it.

Seok Kuan & Charles were more than happy to be our lab rats for this.  The initial scepticism was that it ain’t goint to work because 1) like most medium format cameras, you can’t handhold it unless you’re using strobes  2) Files are huge, it’ll slow you down, kill your computer system later, flood your harddisks, tadi tadi tadi tadi…  Well, I bit the bullet anyway, and so long I have the good old Canon 1Ds mark III, what could possibly go wrong?

People are pretty much contented with what they have, until they’ve touch something that’s a lot better.   I did the assignment with the Canon DSLR on parallel with the Hasselblad H4D-40 and these are some of the images from the mammoth machine…

[nggallery id=18]

Dynamic range is the biggest jump in terms of image quality when compared to the files from the 35mm DSLR – I get really nice tonal graduation especially in the highlights.  What amazes me is the amount of details I can recover from the highlights and shadows when required and if I’m to apply the same processing technique to a 35mm file, I would probably see the details breaking up or looking a little ‘powdery”.  The colors is something that even my clients can tell the difference straight off because of the richness and depth.

Noteworthy is the quality of the Hasselblad lenses.  Again, I’m not going to go into sharpness because that’s a very fundamental quality of most modern lenses anyway.  I tested the 80mm (used 10%) and 28mm (used 90%) and the 28mm is one of the best wide angle glass i”ve used so far.  Distortion is very well controlled , corner to corner sharpness which I could never get on the canon 16-35mm II;  best part is, the flare control is 2nd to none as you can see from one of the veil images that was shot against a strong backlight.

Having said all that, I’m going to be honest here about the limitations of the camera.  However, if you take the effort to work around it, it will do its job wonderfully.  Think of 35mm as a Chef knife and medium format as a parring knife.  A chef knife is going to be able to do 90% of the things you required, but if you require the finese, you’ll need a parring knife for that, which is going to be a lot harder and slower to use in comparison.  Going medium format WILL slow you down, don’t expect to do 10 frames-per-sec-and-pray-one-frame-got-it ; for one, each raw files (and they only have raw setting, no jpeg small, medium or large) is a whooping 54Mb in file size and opens up to 141Mb in uncompressed TIFF or PSD format.  Now that’s for 8-bit files and if you’re to do 16-bit, just multiply that by 2.  I did a 16bit TIFF file that turned out to about 3Gb per image by the time I put in all my adjustment layers and all.  No way can I spray and pray with this camera, it’s about getting the shot right there.  Every shot just have to be on the money or you’re going to be wasting a lot of time and resources culling those unwanted files.

Another reason why you can’t spray and pray would be the battery life of these cameras.  Each battery costs USD$228 from B&H photo or SGD$400+ if you purchase it locally.  Each full charge gives you about 200 exposures before it completely drained off.  In comparison, I have shot 1700 frames from the Canon 1Ds mark III and still left with 15% battery life, in other words, never have I ever completely drained a battery since I bought the camera in 2008!

What you see on screen really does do much justice to the image.  The prints made from it are simply stunning – loads of details at 20×30 print.  It’s not just how sharp the images are at this enlargement factor, it’s how smooth and crisp the details are at this point of ‘torturing’ the image.  It’s like comparing a Ferrari and Subaru WRX, no doubt the latter can go hit 180 km/hr, the car engine would probably be choking and trembling by then as compared to a Ferrari that can drive at that speed pretty effortlessly.  Digital medium format is a completely different class altogether and I’m pretty sure it won’t be just a tool for commercial and fashion photographers only.  Back to this thing about medium format being overkill, well, if a fashion photographer can shoot with digital backs for editorial spreads that are A3 size max, what more wedding photographers who are doing much bigger prints like 24×12″ for our albums or 30×45″ for our canvases?

Lastly, I would like to say a big thank you to Lawrence from Shriro Singapore for loaning us the equipment for the photoshoot.  I’m sure many people who are reading this will be itching to get their hands on a set to test drive soon 🙂

Coming up next… Side by side comparison Hasselblad Vs Canon 35mm

Post to Twitter